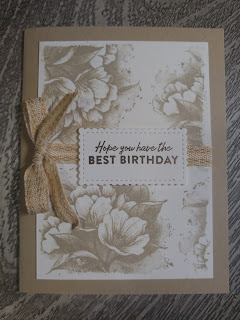
It's your Birthday!!!

It's your Birthday, It's your Birthday!!!! Birthdays are so much fun even if your not a kid anymore. Aren't we all kids deep down? I know I am. I love to celebrate Eating cake, and ice cream...Did I mention eating cake. It's so much fun getting together with family and friends to celebrate that special day.
Supplies used: All items used are current Stampin' Up! products.
- Calming Camellia Stamp Set (158117)
- Friendly Hello Stamp Set (158075)
- Stitched So Sweetly Dies (151690)
- Sahara Sands (147117), Soft Suede Ink (147115)
- Basic White Cardstock (159276)
- Embroidered Ribbon (153554)
Here’s How I made it!
Cut:
- Sahara Sands Cardstock 5 1/2 x 8 1/2
- Basic White Cardstock 4 7/8 x 3 1/2
Before stamping your Basic White Cardstock, using washi tape, place a very thin border around the border.
Stamp using Calming Camellia:
- using Sahara Sand Ink, randomly stamp on the Basic White cardstock. The stamp does not have to be perfect. It can be stamped off as well.
Stamp using Friendly Hello:
- Stamp in Soft Suede Ink the sentiment "Hope you have the BEST BIRTHDAY"
Die cut using Stictched So Sweetly Dies:
- place the rectangle die that measures 2 3/16 x 1 3/16 around your sentiment and die cut
Assemble the Card:
- Fold the Sahara Sands Cardstock, burnish the fold with a bone folder.
- Take the Embroidered Ribbon, cut a piece that will run across the middle of the stamped image. Make the ribbon long enough to slightly wrap around the back of the stamped image. Adhere to the stamped image. Using another piece of ribbon, make a bow. Place on the left hand side of the stamped image. Adhere.
- Using dimensionals, place on the back side of the sentiment that was die cut with the Stitch So Sweetly die. Adhere in the middle of the ribbon.
- Adhere the Basic White cardstock that was stamped with Calming Camellia
I hope you enjoyed making this card with me. It was such a simple, easy card to make when you need something quick. I bet this card would be fabulous with a bright pink color.
Happy Crafting,
Lisa
Thank you for hopping along with us. If you get stuck during the Blog Hop, please use this line-up as a guide.
- Brian King at Stamp with Brian
- Lynn Kolcun at Avery's Owlery
- Pam Morris at Tap Tap Stamp
- Jan Dufour at Stamp Me Silly
- Sheryl Abernathy at Elegant Sentiments
- Renae Novak at Blessed by Cards
- Sue Jackson at Just Peachy Stamping
- Jackie Beers at Blue Line Stamping
- Lisa Graham at Lisa's Little Ink Spots
- Joanne Wittington at The Inky Dragon
- Robin Myren at Songbird Designs by Robin
- Candy Ford at Stamp Candy
- Marilyn Jones at Stamp with MJ

Gasp! This is stunning, Lisa. Just absolutely stunning.
ReplyDeleteBeautiful card Lisa. That stamp set is amazing in the deail it provides.
ReplyDeleteThose Calming Camellia images are STUNNING! Love this card - the neutrals are so pretty. ♥
ReplyDeleteYour card is so pretty! I always forget how beautiful monochromatic cards can be & yours is over the top gorgeous!
ReplyDeleteOh my goodness! I literally gasped when I saw your card. It is absolutely STUNNING!!
ReplyDeleteThis is a beautiful monochromatic card with the calming camellias. So pretty! Enjoy your day!
ReplyDeleteLove this and love that tone on tone look!
ReplyDeleteWhat kind of cake? I am enjoying monochromatic cards using the Calming Camellias stamp set. Great card.
ReplyDelete