Tag You're It
Welcome to InKing Royalty's November Blog Hop! During this year's blog hops, we are having fun with our stamping favorites - our favorite themes for seasonal cards and projects. This month's projects feature pretty packages and beautiful tags to inspire your holiday gift-giving. We are excited to share our creations with you today! After you read my post, I hope you'll hop over to the next person on the list at the base of this post.
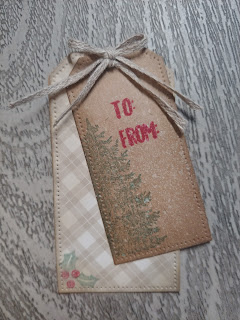
I just love Hallmark movies...Who doesn't?!! I love to see towns transform for the Christmas holiday's. Especially when it has that vintage look. Today I made a vintage tag that reminds me of a old fashion Christmas.
Supplies used: All items used are current Stampin' Up! products.
- Evergreen Elegance (153313)
- Tailor Made Tag Dies (155563)
- Banner Year (158239)
- Peaceful Prints DSP (156628)
- Kraft 6x6 Paper (156325)
- Ink used: Evening Evergreen (155576), Real Red (126949), Soft Suede (147115), Whisper White (147524)
- Braided Linen Trim (147808)
Here’s How I made it!
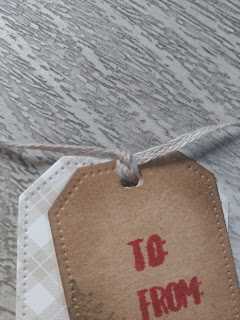
- Using the largest tag in the Tailor Made Tag die, die cut using the Peachful Prints DSP, and the 6x6 Kraft paper. Then using the next smaller die, die cut the using the Kraft 6x6 paper.

- Adhere the tag using the Peaceful Prints DSP to the larger tag using the Kraft paper together. Using your Soft Suede ink, blend the edges to give a distressed look.
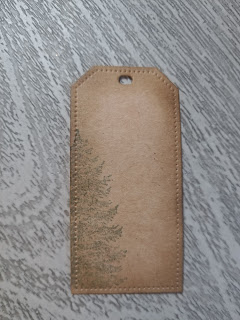
- Using your Evening Evergreen ink, stamp a tree on the edge of the smaller tag. Also blend the edges using the Soft Suede ink to give a distressed look.
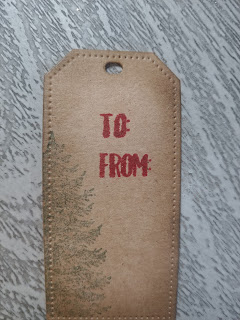
- Using the Banner Year stamp set, using the holly leaves and berries, stamp the holly leaves in Evening Evergreen and the berries in Real Red. Stamp on the corner of your larger tag on left bottom side.
- Using the Evergreen Elegance stamp set, using one of the larger trees, using Evening Evergreen ink, stamp off on a piece of scrap paper and then stamp half way on your tag.
- Using the Banner Year stamp set in Real Red, stamp the To:/From: on the top part of your tag.
- Take your small tag and place on top of your larger tag. I used a glue dot to adhere together.
- Cut a piece of Braided Linen Trim 12 inch long. I wrapped my ribbon several times and then tide with a knot. If you are good with bow many, you can then tie a bow at the top. On my finished tag, I tied another bow and glued onto my wrapped trim.
Happy Crafting!!!
Lisa
- Brian King at Stamp with Brian
- Marilyn Jones at Stamp with MJ
- Ann Murray at Murray Stamps Ink
- Pam Morris at Tap Tap Stamp
- Jackie Beers at Blue Line Stamping
- Renae Novak at Blessed by Cards
- Candy Ford at Stamp Candy
- Jan Dufour at Stamp Me Silly
- Sue Jackson at Just Peachy Stamping
- Robin Myren at Songbird Designs by Robin
- Lynn Kolcun at Avery's Owlery
- Sheryl Sharp at Sharp Notes by Sheryl
- Lisa Graham at Lisa's Little Ink Spots


I love your vintage tag! The shading and tree are perfect.
ReplyDeleteLisa, your vintage tag is beautiful. Your shading and layering are spot on.
ReplyDeleteI adore the vintage feel of these tags - you've really transformed cardstock and simple DSP into beautiful tags! ♥
ReplyDeleteLove your vintage tags! You captured “Old fashioned Christmas” just perfectly.
ReplyDeleteYour layered tag is awesome. You nailed the vintage Hallmark Christmas essence.
ReplyDeleteYour vintage tag is perfection! Love the stamping and distressing. Just lovely.
ReplyDeleteLove your tag and of course love Hallmark Movies, at least the old ones. Christmas Card is my all time favorite. Really it is a Christmas Hallmark Movie!
ReplyDelete